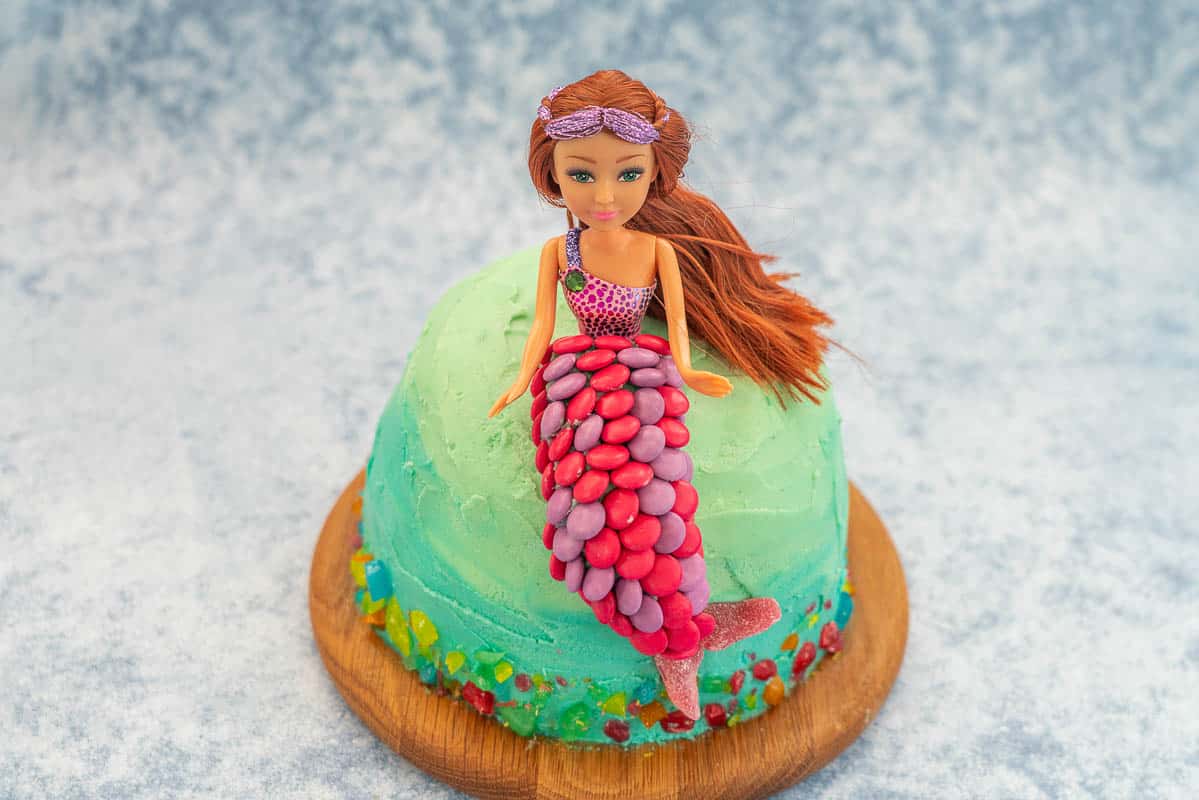
Super Easy Mermaid Birthday Cake Recipe
I think everyone goes through a Mermaid phase in their childhood. If your child has requested a mermaid cake for their birthday then you are in the right place. This is a super-easy way to make a gorgeous kids birthday cake for a mermaid-themed party!
Why this recipe works
- It's really easy and you don't need any fancy equipment
- There is no fondant required, this cake is all about buttercream, food coloring and candy decorations
- Plenty of wow factor for birthday parties without too much effort
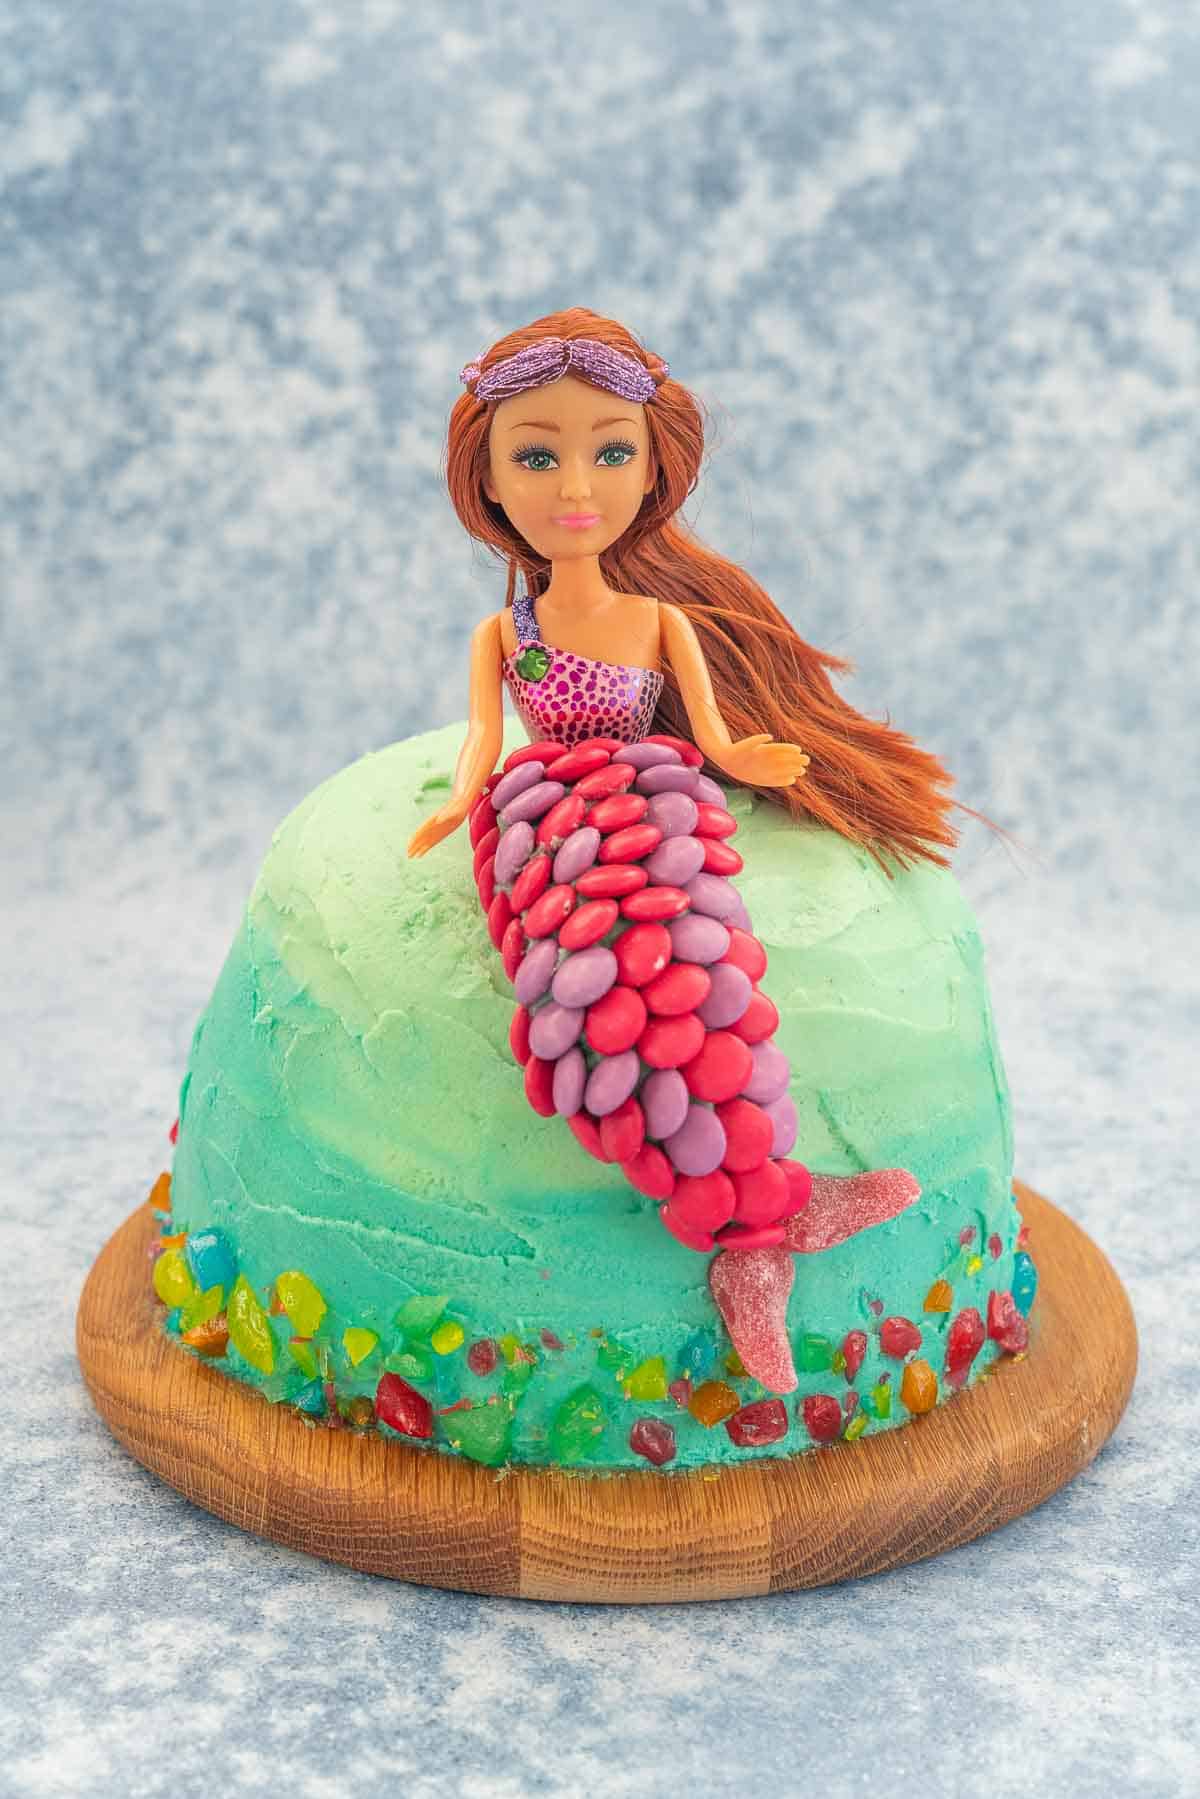
The ingredients you will need
For this cake you will need chocolate cake batter, you can either make your own or use a store-bought packet mix (absolutely no judgement here). Ingredients for buttercream (butter, icing sugar, milk and food coloring) and candy/sweets for bringing the mermaid cake to life!
- I include a recipe for buttercream in the recipe card.
- You will also need a doll (barbie doll or similar) that will form the cake topper.
How to Make a Mermaid Cake
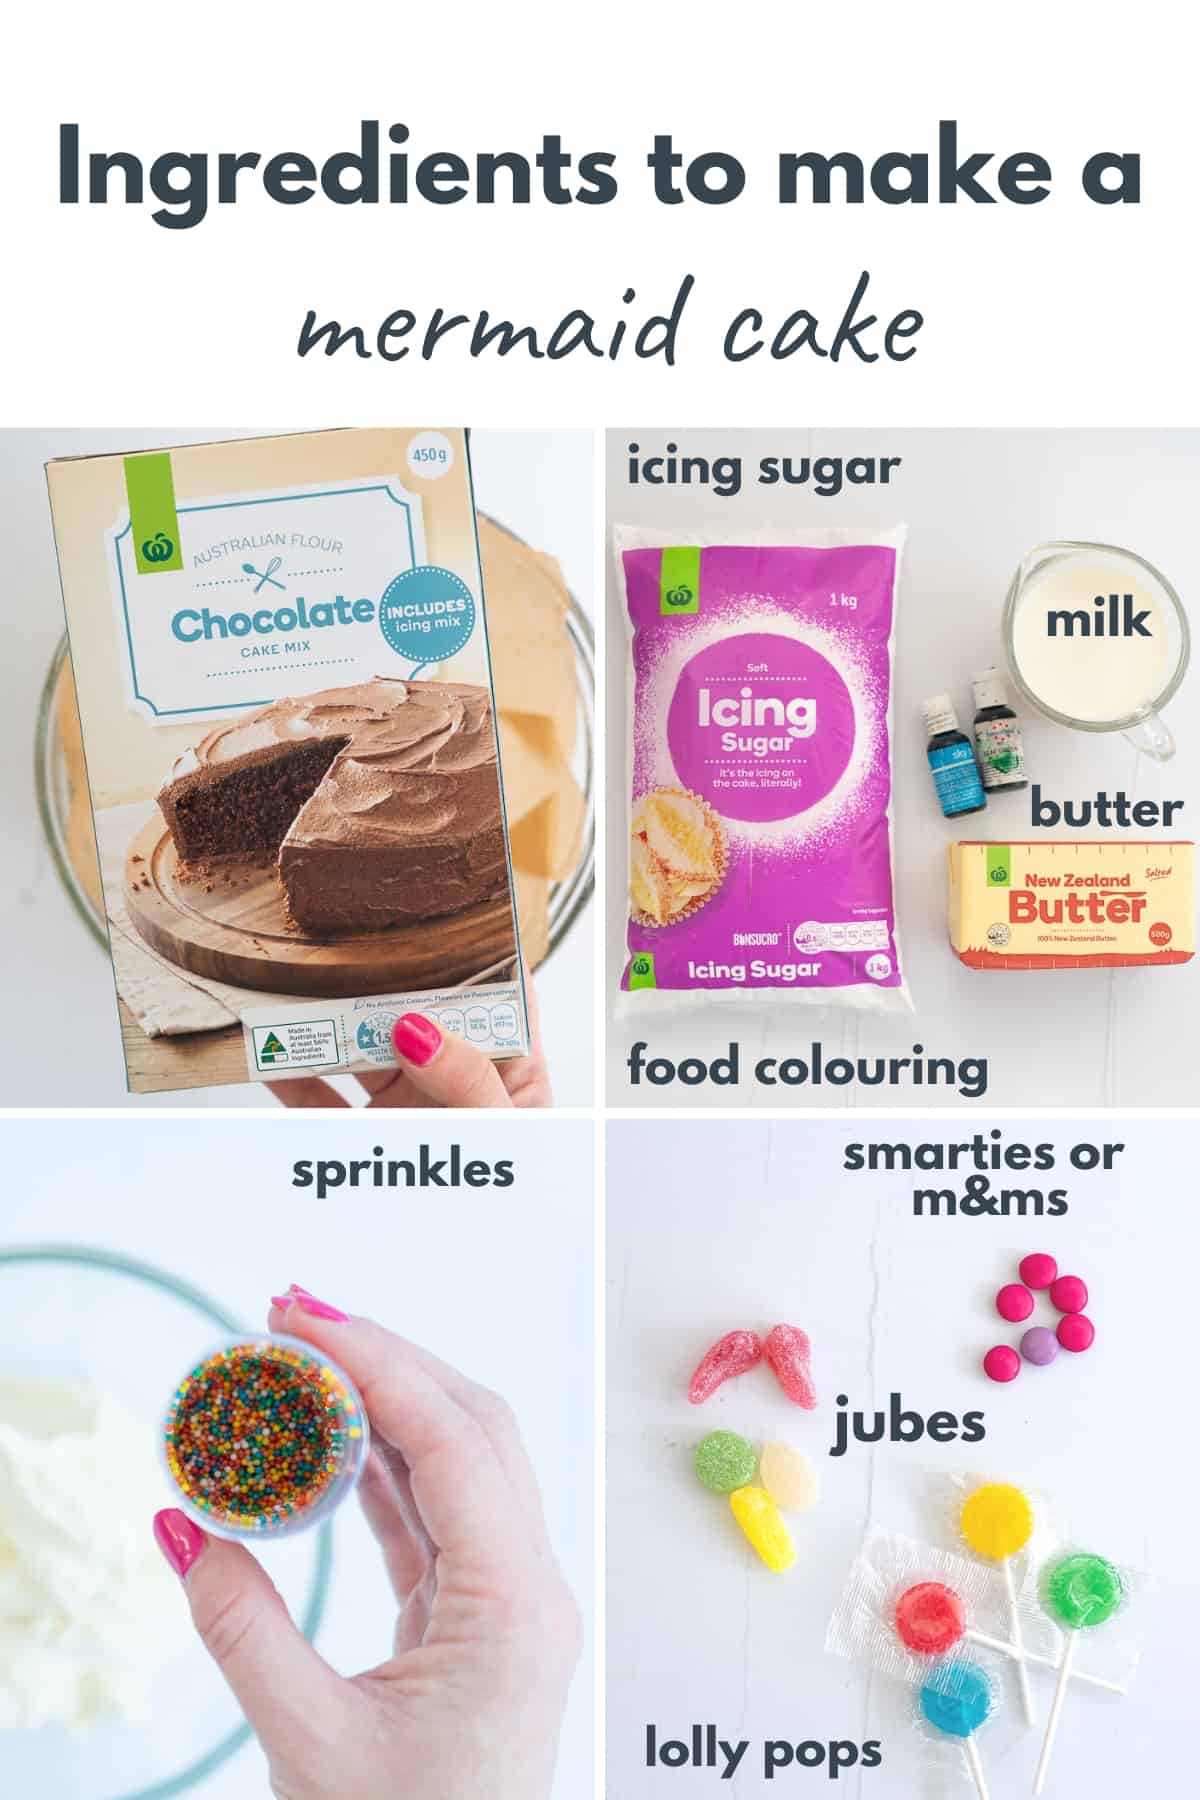
Make the cake
- I used a mixing bowl instead of a cake tin to make the cake as I wanted a rounded dome shape. You could use round cake tins. (mixing bowl dimensions: 22 cm diameter at widest point, approx. 12cm deep (photo 1)
- line the mixing bowl: Fold a piece of baking paper over and over to form a long thing triangle. Hold the point of the triangle at the middle of the bowl, measure to the edge of the bold and trim the triangle to this length. (photo 2)
- Open out the triangle, it will now be a rough circle. Cut down one of the lines to the centre point (photo 3)
- You should now be able to push the baking paper down into the bowl, you can use the creases to fold the baking paper to fit (photo 4)
- Prepare the chocolate cake batter: I used 2x Countdown 450g chocolate cake baking mixes to make my batter (photo 5) If you would prefer to not use a cake mix for the cake, my plain cake recipe would work brilliantly.
- Pour into the lined bowl or cake pans (photo 6)
- Bake as per the cake batter instructions. If you are using a large mixing bowl as I did, the cooking time may be longer than in a regular cake tin.
- Cool completely
Prepare the mermaid topper and cake layers
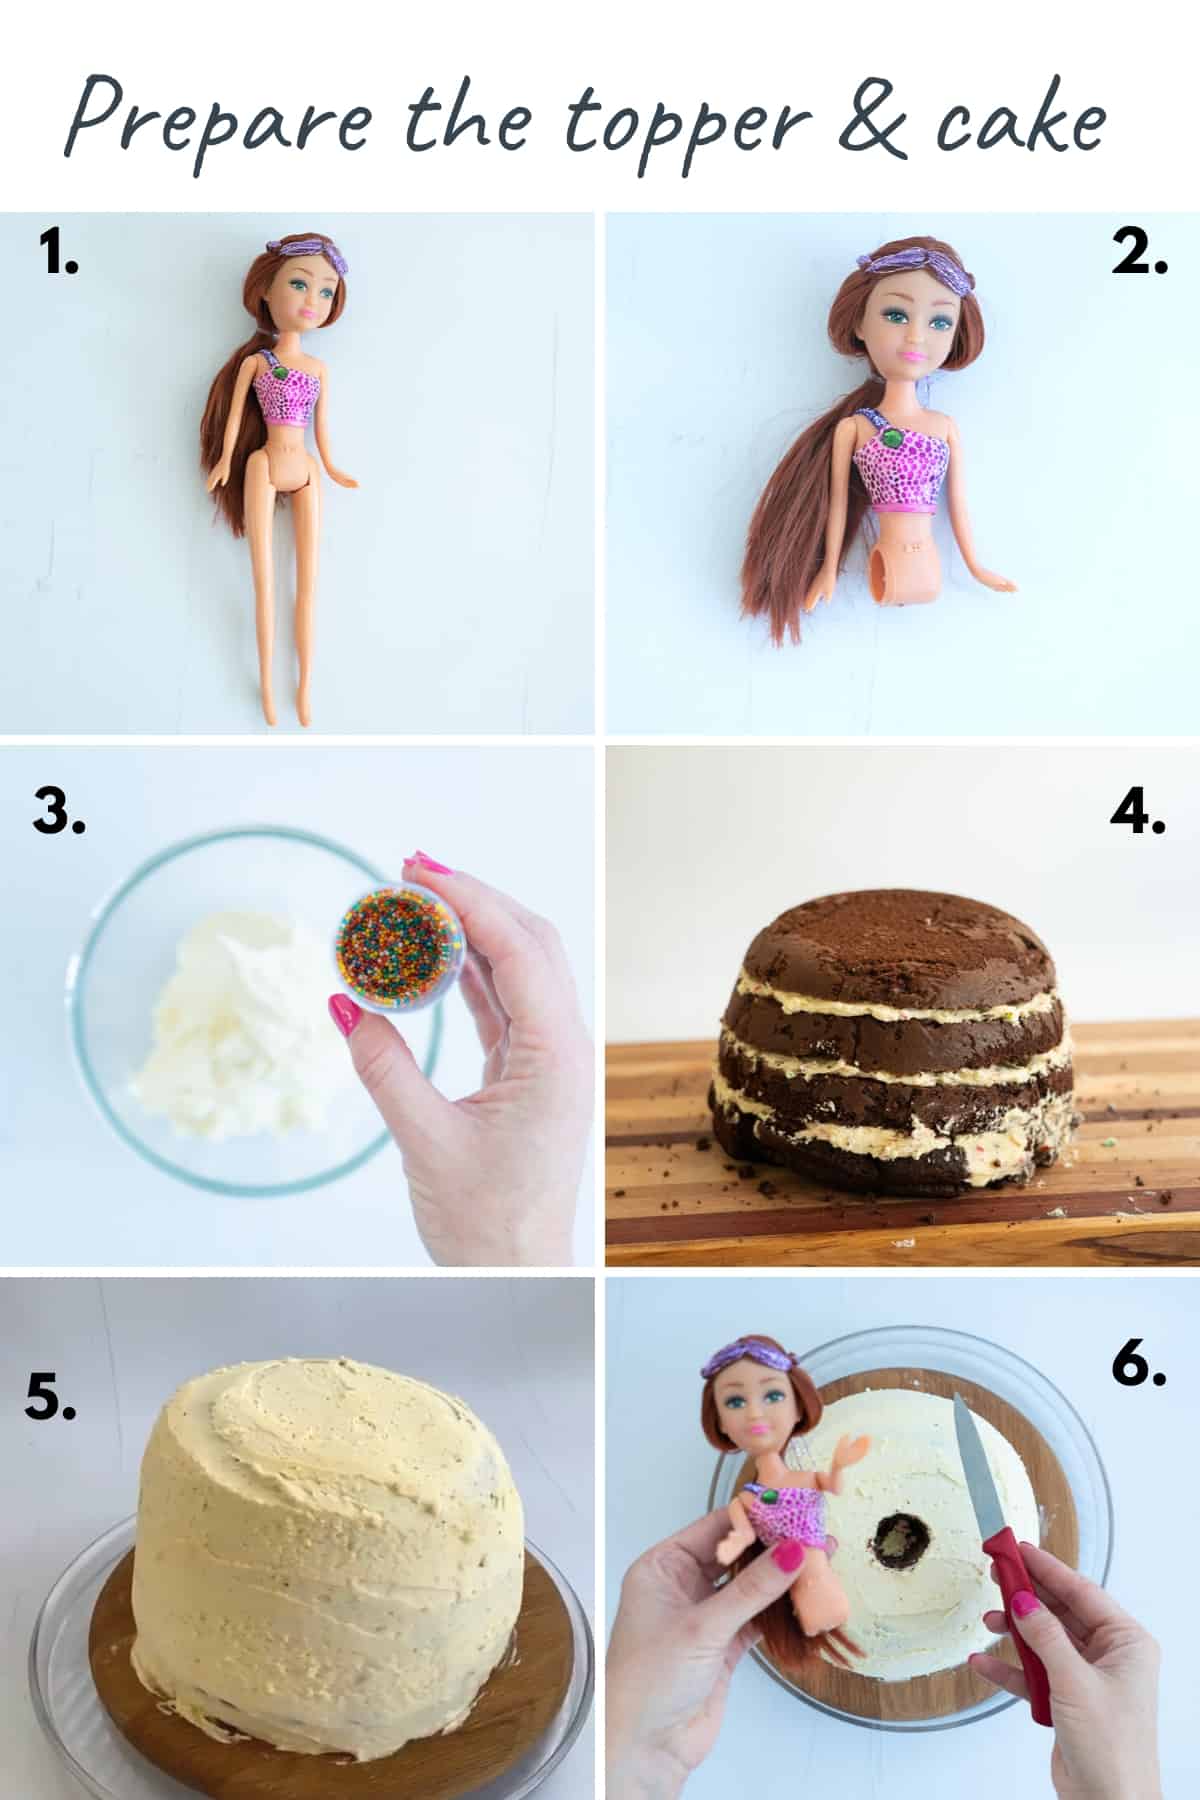
- Remove the legs from the doll (photos 1 and 2) this will become your mermaid cake topper
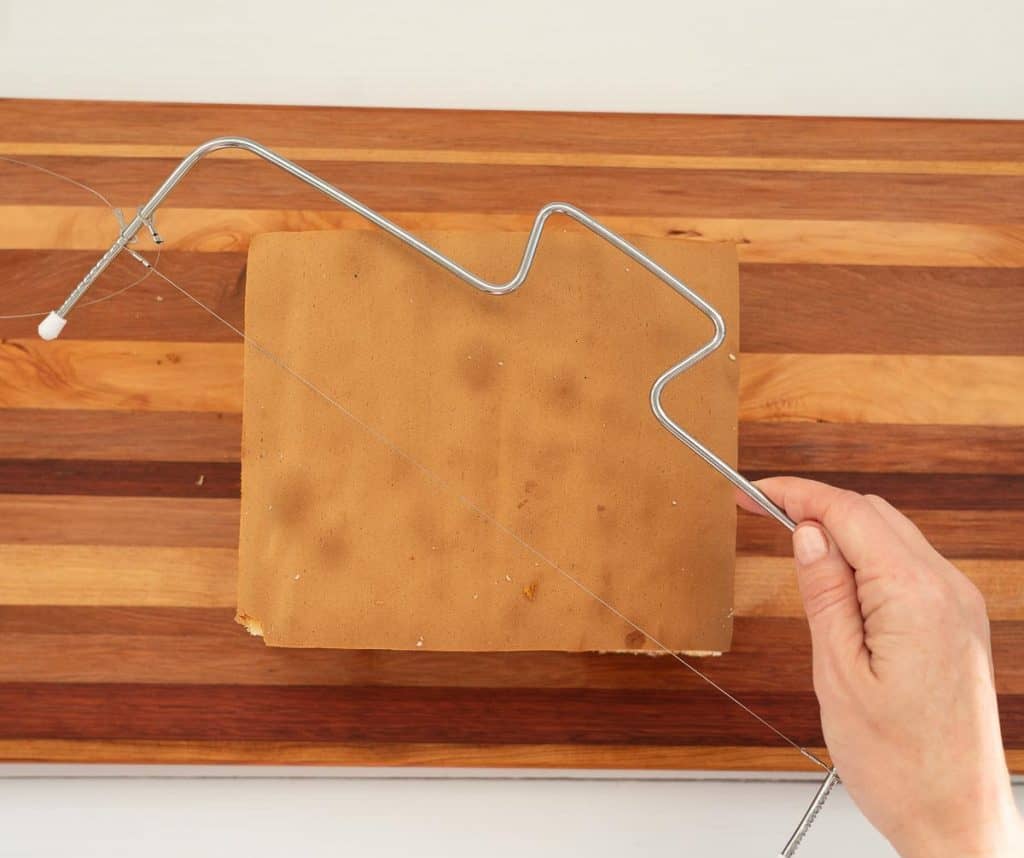
- I used a cake leveler to first level my cake and then split the cake into 4 layers. You could also just use a bread knife. If you are using a bread knife it can be easier to cut the cake if chilled and/or frozen. It would also be ok to do fewer layers. It's up to you
- Keep any offcuts of cake you end up with when leveling the cake, as you will use these cake crumbs to form the tail
- Prepare the buttercream (see recipe card).
- Take ¼ of the uncoloured buttercream mix in sprinkles to make it funfetti buttercream. (you can use as many or as few sprinkles as you like) (photo 3)
- Use the funfetti buttercream to stick together the cake layers (photo 4)
- Crumb coat: Take another ¼ of the uncoloured buttercream and apply a thin layer of it all over the cake. This is the crumb coat, it will make it easier to frost the cake later when you are applying the coloured buttercream. (photo 5)
- If you have any leftover buttercream save it as you can use it later to form the mermaid tail
- Use a small knife or spoon to cut a well out of the top of the cake that will fit the base of the doll. (photo 6)
- Refrigerate the cake until the crumb coat is firm. I often do this overnight, but an hour or so will work too.
Save This Recipe!
Frost and decorate the cake
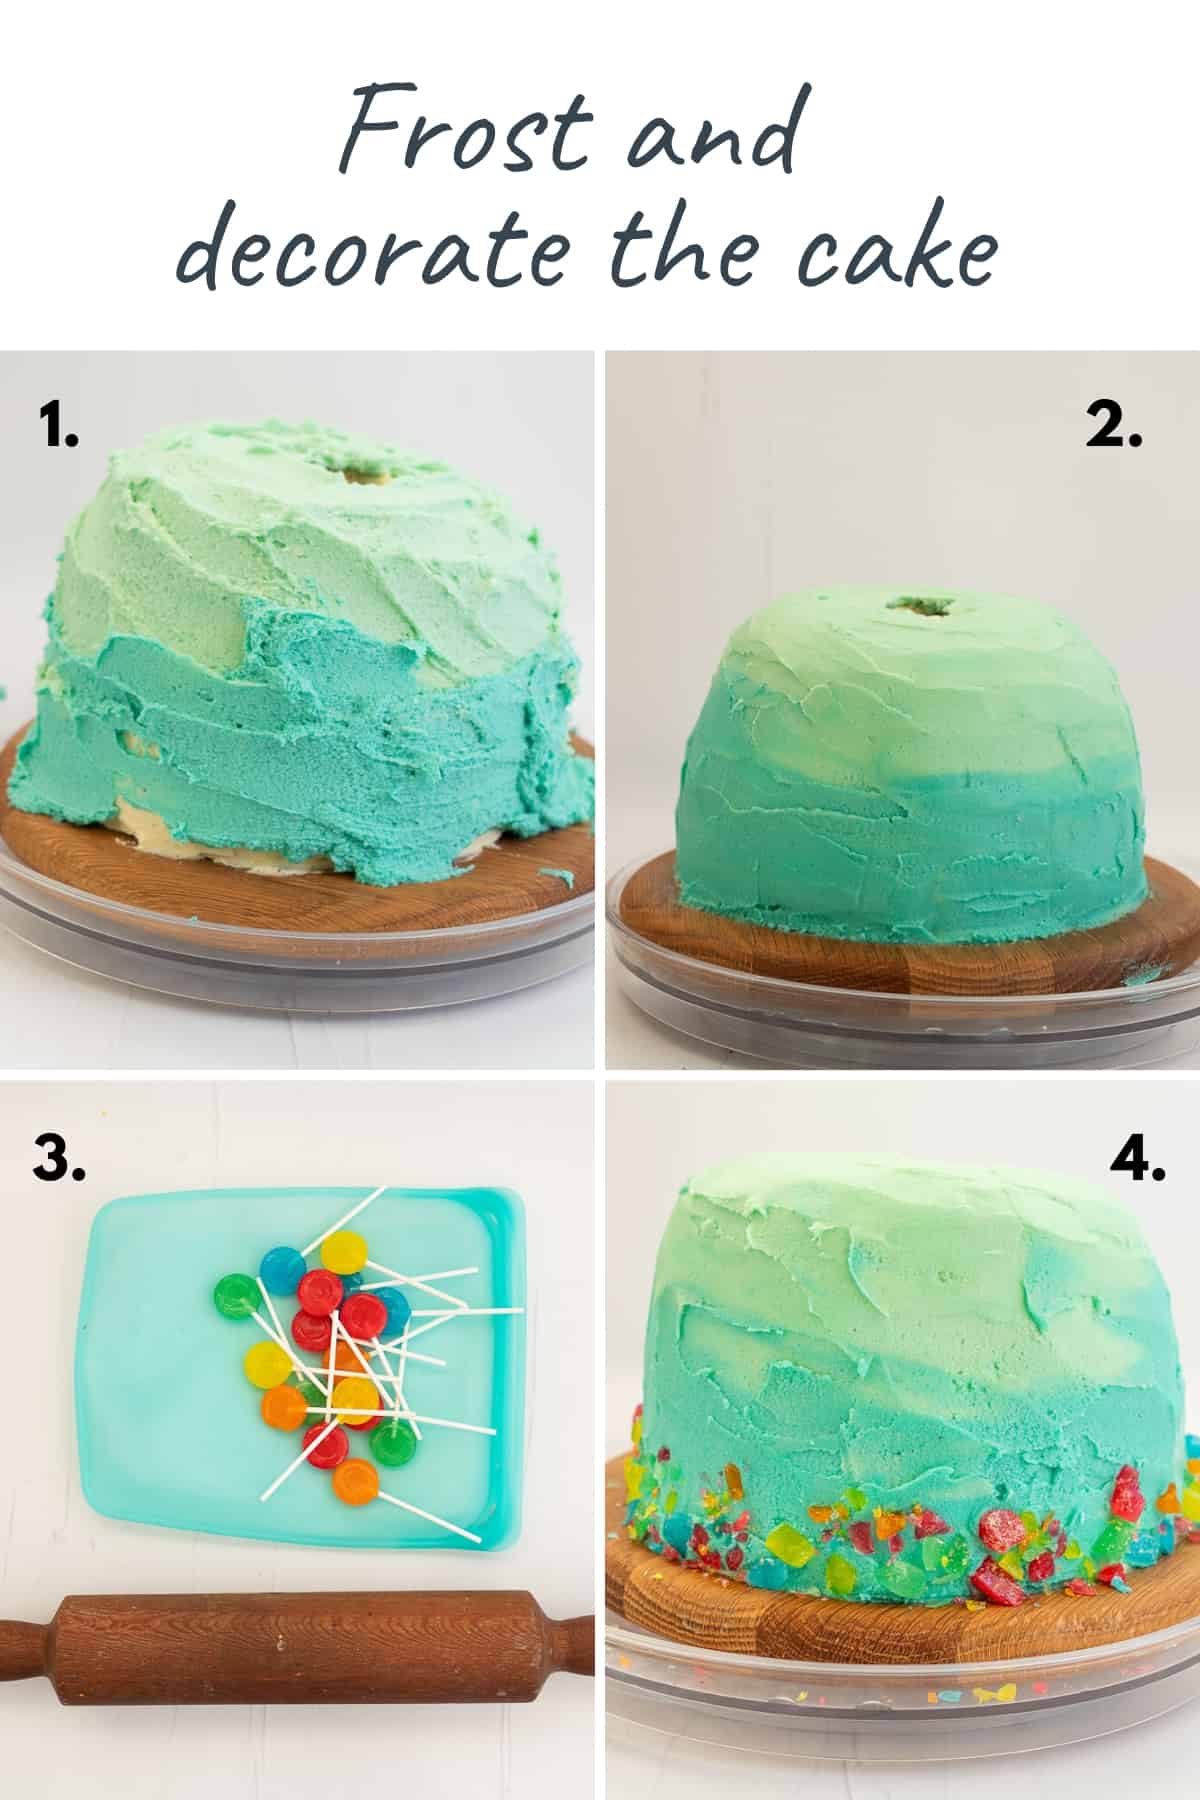
- Colour the buttercream: You should have ½ of the butter cream remaining. Use a little blue food coloring to colour the icing a pale blue.
- Remove ½ of the light blue buttercream and apply it to the top half of the cake, this can be done roughly with a knife or use a piping bag(photo 1)
- Add more blue food coloring to the remaining buttercream to make a darker blue colour
- Apply the darker blue buttercream to the bottom half of the cake you can use either. aknife, spatula or piping bag. (photo 1)
- Dip a bread and butter knife (or metal cake spatula) in hot water, shake to remove excess water Use the hot knife to smooth the buttercream, you will end up with an ombré effect (photo 2)
- If you have any leftover buttercream save it as you can use it later to form the mermaid tail
- Place the lollypops in a plastic bag. Use a rolling pin to break up the lollypops. I smashed around 12 lollypops, but I probably only needed half this quantity. (photo 3)
- Press the broken lolly pops around the bottom of the cake, this is meant to look like colourful coral and seaweed (photo 4)
Create the mermaid
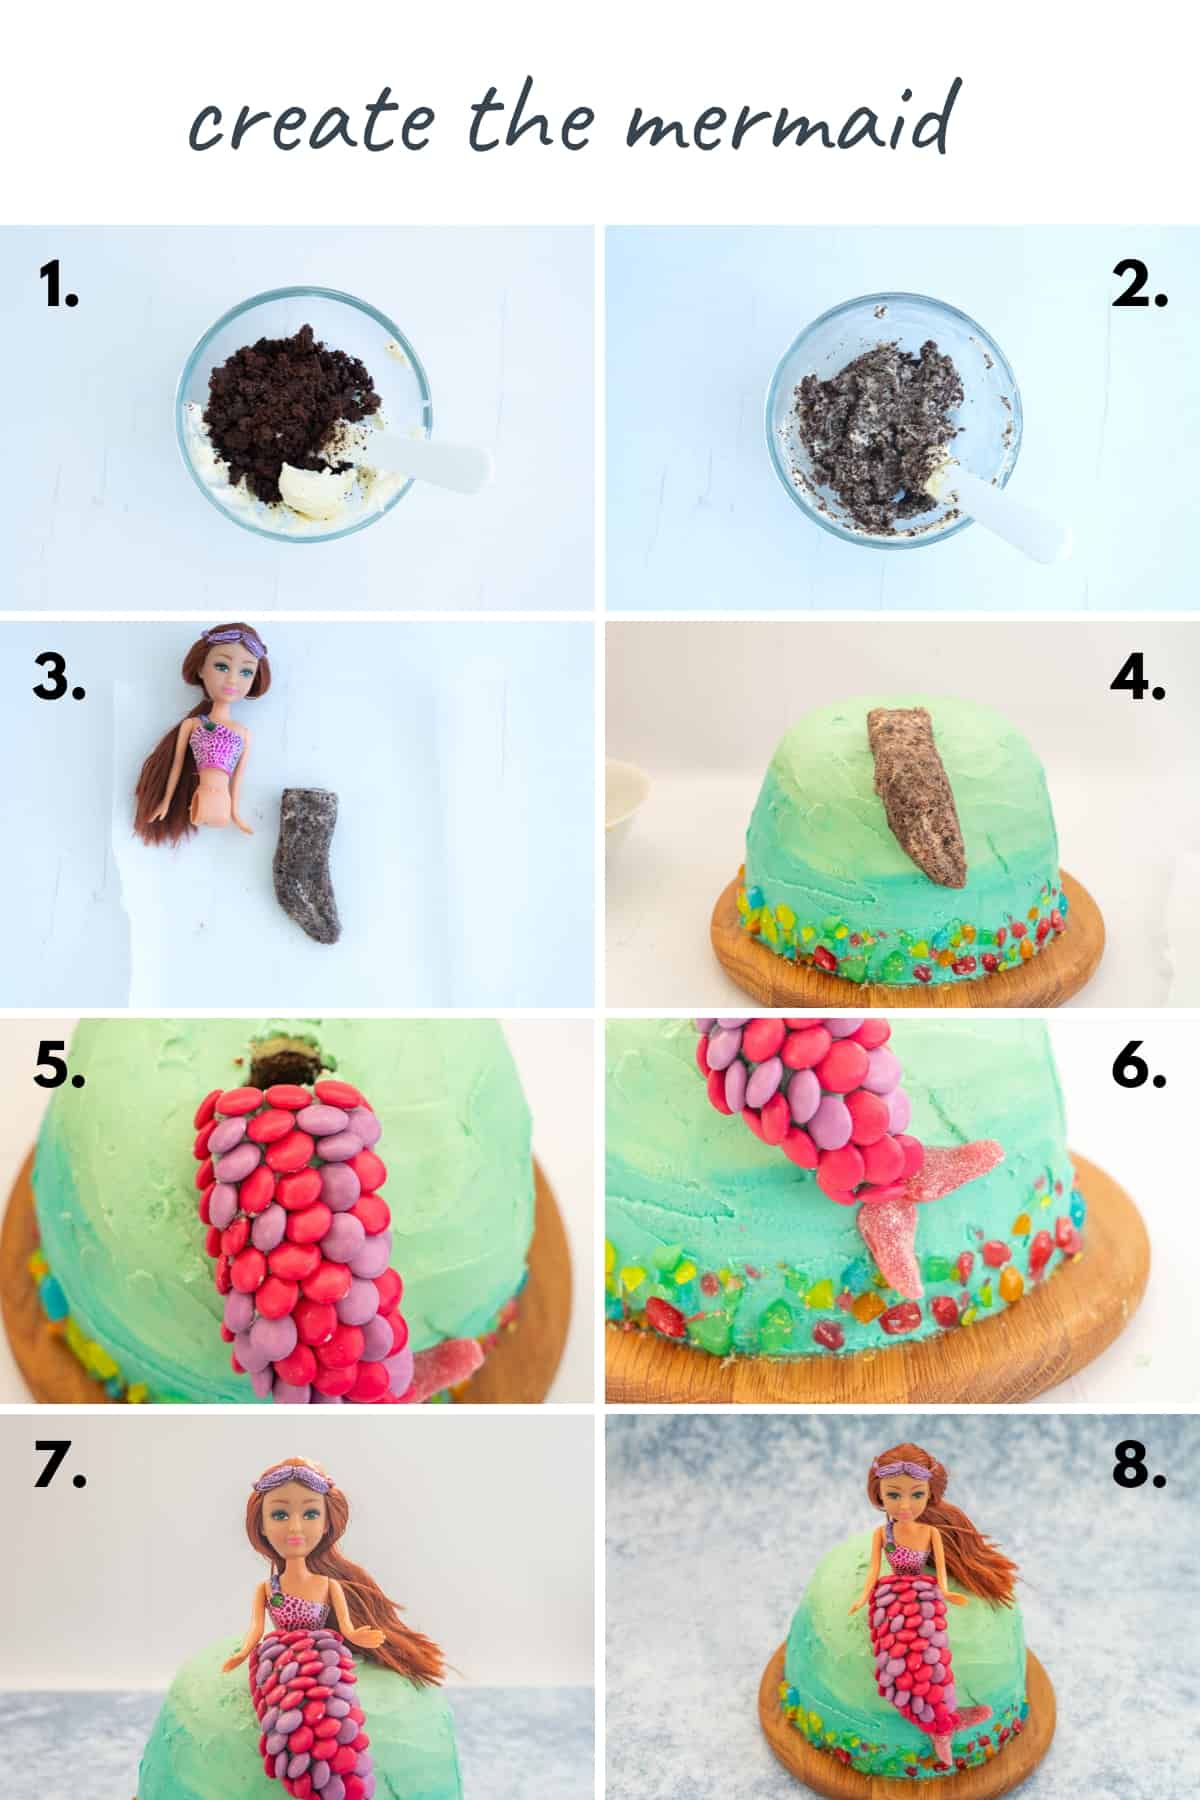
- Take the offcuts you saved when leveling the cake, crumble them with your fingers so that you end up with cake crumbs. (photo 1)
- Mix these cake crumbs with a little leftover buttercream (photo 2)
- The crumb buttercream mix should be easy to work with, use your hands to form a mermaid tail shape. (photo 3)
- Position the tail on top of the cake in front of the well you created for the mermaid cake topper. (photo 4)
- Frost the tail with a thin layer of buttercream, just enough to hold the candy decorations in place (you can use any colour)
- Arrange the smarties or m&ms to look like scales and completely cover the tail. I used pink and purple smarties but you could use any colour combination that you want (photo 5)
- Take 2 jubes and position these at the end of the tail to look like flippers, you could also use spearmint leaves for this (photo 6)
- Position the doll in the well, you may need to fill in any gaps with a little buttercream and candies. (photo 7)
- Your cake is now complete! (photo 8)
Recipe FAQs and Tips
You can use any cake batter that you like to create the mermaid cake, a gluten free cake will work just fine. The buttercream and candy used to decorate the cake are typically gluten free
Yes, stages of this cake can be completed in advance to take the pressure off on party day. The cake it self can be baked and frozen up to 3 months before the party. The cake can be frosted up to 3 days before the party (it will need to be stored in the refridgerator) The candy decorations are best if not added until the day of the party)
- Cake levelers are inexpensive and make creating cakes with multiple layers so easily
- You can make your buttercream up to 3days in advance. Make it then store in an air tight container and refrigerate it. When you wish to use it again, bring it back to room temperature and beat it again briefly. If it is a little too stiff you can add a little extra milk to loosen it to a workable texture.
Easy Birthday Cake Ideas for Kids Birthday Parties
- Frozen fans will love my Elsa Cake
- My PJ masks cake is easy but looks impressive
- Mermaids and unicorns often go hand in hand, my unicorn cupcakes would be great at a birthday party
- I also have an easy first birthday cake idea that is a little healthier as it is decorated with fruit rather than buttercream and sweets
Mermaid Cake
RATE THIS RECIPE
Save This Recipe!
Ingredients
- 900 g chocolate cake mix
- 500 g butter
- 6 cups icing sugar
- 4 teaspoons vanilla essence
- 8 Tablespoons milk
- Blue food colouring
- 6 brightly coloured lollypops
- 2 x Jube lollies
- Smarties or m&ms
- 1 x Barbie doll or similar
Instructions
Make the cake
- I used a mixing bowl instead of a cake tin to make the cake as I wanted a rounded dome shape. You could use round cake tins, and stack two cakes on top of each other.
- line the mixing bowl: Fold a piece of baking paper over and over to form a long thing triangle. Hold the point of the triangle at the middle of the bowl, measure to the edge of the bold and trim the triangle to this length.
- Open out the triangle, it will now be a rough circle. Cut down one of the lines to the centre point
- You should now be able to push the baking paper down into the bowl, you can use the creases to fold the baking paper to fit
- Prepare the chocolate cake batter: I used 2x Countdown 450g chocolate cake baking mixes to make my batter
- Pour into the lined bowl or cake tins
- Bake as per the cake batter instructions. If you are using a large mixing bowl as I did, the cooking time may be longer than in a regular cake tin.
Make the buttercream
- Start with softened butter (not melted, but soft). Use an electric beater or cake mixer to beat the butter until it is as white as possible.
- Then add ⅓ of the icing sugar and beat, add ⅓ of the milk, alternate adding the icing sugar and milk until it has all been added, flavour the icing with the vanilla
- The buttercream will be used throughout the recipe
Prepare the mermaid doll
- Remove the legs from the doll this will become your mermaid cake topper
Level & layer the cake
- Use a cake leveler to first level your cake and then split the cake into 4 layers. You could also just use a bread knife. If you are using a bread knife it can be easier to cut the cake if chilled and/or frozen. It would also be ok to do fewer layers. It's up to you
- Keep any offcuts of cake you end up with when leveling the cake, as you will use these cake crumbs to form the tail
- Take ¼ of the uncoloured buttercream mix in sprinkles to make it funfetti buttercream. (you can use as many or as few sprinkles as you like)
- Use the funfetti buttercream to fill the layers of the cake
- Crumb coat: Take another ¼ of the uncoloured buttercream and apply a thin layer of it all over the cake. This is the crumb coat, it will make it easier to frost the cake later when you are applying the coloured buttercream. The crumb coat does not need to be perfect
- If you have any leftover buttercream save it as you can use it later to form the mermaid tail
- Use a small knife or spoon to cut a well out of the top of the cake that will fit the base of the doll. (photo 6)
- Refrigerate the cake until the crumb coat is firm. I often do this overnight, but an hour or so will work too.
Frost the Cake
- Colour the buttercream: You should have ½ of the buttercream remaining. Use a little blue food colouring to colour the icing a pale blue.
- Remove ½ of the light blue buttercream and apply it to the top half of the cake, this can be done roughly
- Add more blue food colouring to the remaining buttercream to make a darker blue colour
- Apply the darker blue buttercream to the bottom half of the cake
- Dip a bread and butter knife (or metal cake spatula) in hot water, shake to remove excess water Use the hot knife to smooth the buttercream, you will end up with an ombré effect
- If you have any leftover buttercream save it as you can use it later to form the mermaid tail
- Place the lollypops in a plastic bag. Use a rolling pin to break up the lollypops. I smashed around 12 lollypops, but I probably only needed half this quantity.
- With your fingers, press the broken lolly pops around the bottom of the cake, this is meant to look like colourful coral and seaweed
- Create the mermaid
- Take the offcuts you saved when leveling the cake, crumble them with your fingers so that you end up with cake crumbs.
- Mix these cake crumbs with a little leftover buttercream
- The crumb buttercream mix should be easy to work with, use your hands to form a mermaid tail shape.
- Position the tail on top of the cake in front of the well you created for the mermaid cake topper.
- Frost the tail with a thin layer of buttercream, just enough to hold the candy decorations in place (you can use any colour)
- Arrange the smarties or m&ms to look like scales and completely cover the tail. I used pink and purple smarties but you could use any colour combination that you want
- Take 2 jubes and position these at the end of the tail to look like flippers, you could also use spearmint leaves for this
- Position the doll in the well, you may need to fill in any gaps with a little buttercream and candies.
- Your mermaid cake is now complete!
Video
Notes
- The mixing bowl dimensions that I used as a cake tin: 22 cm diameter at widest point, approx. 12cm deep
- You can use any cake batter recipe for this cake, it does not need to be chocolate. I used 2 x Countdown chocolate cake mixes
- When I make buttercream for a.birthday cake, I find it easier to make slightly too much than too little, you may end up with leftover buttercream
Quick Start Guide To BLW
Baby led weaning doesn’t need to be complicated, grab my quick start guide to begin your little ones food journey.