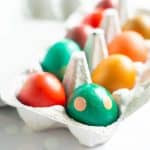
Coloured Eggs
Coloured eggs are simple to make, yet such a lovely thing to do for Easter. Add them to an Easter grazing board.
Servings: 6 eggs
Calories: 79kcal
Ingredients
- 6 hard boiled eggs
- 3 cups boiling water
- 6 teaspoons vinegar
- food colouring
Instructions
Hard boil Eggs
- Place 6 eggs in the bottom of a large saucepan. Cover the eggs with cold water so they are all covered by at least an inch of water.
- Bring the eggs to a boil, once the eggs are rapidly boiling, cover with a lid and turn off the heat. Leave the eggs to stand for 12 minutes.
- Drain the eggs and then run them under cold water.
- Chill in the fridge before colouring them. The hard boiled eggs can be stored in the fridge for five days.
Colouring Eggs
- For each colour you decide to dye your eggs you will need a small bowl or cup. I find cups easier as you need less dye mixture to completely submerge the eggs.
- Mix ½ cup of boiling water with 1 teaspoon of vinegar and 10-15 drops of food colouring
- Soak the eggs for approximately 5 minutes in the dye baths
- Use tongs or a slotted spoon to remove the eggs from the dye. Place the eggs onto a piece of paper towel until dry.
- Once dry to the touch store the eggs in the fridge. Hardboiled eggs can be stored for up to 5 days in the fridge.
Notes
When I was making coloured eggs with my brown eggs I found these things gave the best results
Don't skip the vinegar: You get a more consistent and vibrant colour if you add vinegar to the water when dying eggs. The lower pH allows the food colouring to bind more tightly to the eggshell.
Hard-boiled eggs: I tested dying raw eggs, I found the shell seemed more porous which meant the colour was not as consistent.
Cold eggs: I found chilled hard-boiled eggs worked the best for me
Colour choice: Different colours worked better on my brown shelled eggs than others
- Yellow: On a brown shelled egg the colour change was very subtle
- Blue: I found aqua ie a combination of blue and green gave a better end result than straight blue. 10 drops blue + 5 drops green
- Red: Worked well
- Purple: I found a more red-based purple worked better. 10 drops red 2 drops red
- Green: Straight green worked well
- Orange: Orange worked well 10 drops red + 5 drops yellow
Nutrition
Serving: 1egg | Calories: 79kcal | Carbohydrates: 1g | Protein: 6g | Fat: 5g | Saturated Fat: 2g | Polyunsaturated Fat: 1g | Monounsaturated Fat: 2g | Cholesterol: 187mg | Sodium: 63mg | Potassium: 67mg | Sugar: 1g | Vitamin A: 260IU | Calcium: 26mg | Iron: 1mg